2 very usefull programs to :
- manage color sets (random, more contrasted, etc.)
- pick color from everywhere on your screen
apt-get install gcolor2 agave
2 very usefull programs to :
apt-get install gcolor2 agave
Quelle est la probabilité durant une année quelconque qu’il y ait un accident nucléaire majeur, connaissant la probabilité d’accident majeur par réacteur et le nombre de réacteurs en service ?
Comme je n’ai plus fait de combinatoire depuis longtemps, je demandais aux commentateurs de me corriger si nécessaire. eneite (2) m’assure que ma formule est correcte, je la reproduis donc ici.
R(n) = 1 – (1-p)^n
Disons que le risque pour un réacteur est d’un accident majeur tous les cinq mille ans. S’il n’y a qu’un réacteur au monde, le risque d’un accident majeur pour une année x est de 0,2 %o. Si j’ai 443 réacteurs en service dans le monde – ce qui est apparemment le cas aujourd’hui – quel est le risque d’un accident majeur sur une année, et par exemple, sur l’année en cours ?
R(443) = 1 – (0,9998)^443 = 8,48 %
On voit donc que même avec une probabilité d’accident qui paraît extrêmement faible : un accident seulement tous les 5 000 ans pour un réacteur, on débouche pourtant sur une probabilité de 8,48 % d’accidents majeurs par an si l’on a 443 réacteurs en service, c’est-à-dire un niveau très loin d’être négligeable.
This is a little cookquide to setup a ssh tunnel through a proxy web. Your DNS queries will also be tunneled.
First step, you need a ssh server on a remote server.
Configure it to listen to port 443 :
file : /etc/ssh/sshd_config
Port 22
Port 443
Then you need to install corkscrew (on your local machine) :
sudo apt-get install corkscrew
Then create (or edit) your local ssh config file (~/.ssh/config) :
Host ssh-proxy
HostName your-remote-ssh-server
# Local SSH Server port
Port 443
# Keep-Alive
KeepAlive yes
ProtocolKeepAlives 60
# Use proxy with login/passwd
# ProxyCommand /usr/bin/corkscrew address-of-proxy 3128 %h %p /home/user/.ssh/proxy_auth
# Use proxy without authentication
ProxyCommand /usr/bin/corkscrew address-of-proxy 3128 %h %p
If your proxy need authentication, enable first ProxyCommand line and add in ~/.ssh/proxy_auth credentials for proxy :
user:password
Then launch your ssh tunnel through the proxy
ssh -D 9999 user@ssh-proxy
From this point, you can use your application with proxy socks enabled to localhost:9999 and you can reach the web.
if you just need to browse, you can directly forward your DNS queries through proxy socks with (in Firefox) :
about:config search string “dns” enable to “true” key “network.proxy.socks_remote_dns”
And now, how to send your DNS queries also through your ssh tunnel.
Install socat tool on your remote server AND on your local machine :
sudo apt-get install socat
On your remote server, launch socat to transform TCP request from 5353 to DNS UPD queries 53 (in this command, we use Google DNS) :
socat tcp4-listen:5353,reuseaddr,fork UDP:8.8.8.8:53
On your local machine, launch socat to transform local DNS queries to TCP port 5353 (need to be launched as root, since we listen on port 53) :
sudo socat -T15 udp4-recvfrom:53,reuseaddr,fork tcp:localhost:5353
Edit your /etc/resolv.conf file to add a “local DNS server” :
nameserver localhost
And eventually, launch a a specific DNS tunnel over SSH :
ssh -N -L 5353:localhost:5353 user@your-remote-server
You can ping real world
To resume, once tools are installed, you need to launch (in this order) :
First terminal :
Second terminal :
Third terminal :
Thanks to : http://zarb.org/~gc/html/udp-in-ssh-tunneling.html / http://tcweb.org/wiki/Traverser_un_proxy
Create a symlink and avoid the smb://…..file….
ln -s ./.gvfs network
Si vous venez de changer de livebox pour la nouvelle version fibre, il est surrement impossible de se connecter en wifi avec Ubuntu 10.10 et wpa_supplicant (sur eeePc par ex).
Solution, se connecter sur:
Et dans wifi, changer “Mode de sécurité” en WPA2-PSK (AES).
Goal : redirect local root email to an external email
Add this line to the bottom of /etc/aliases:
root: your_email@domain.com
Run this command:
newaliases
Restart postfix
Test
echo “test root” | sendmail root
To change the export resolution, add this:
http://extensions.services.openoffice.org/en/project/EnhancedGraphicExportDialogs
http://ondras.zarovi.cz/sql/demo/
source is available here: http://code.google.com/p/wwwsqldesigner/downloads/list
Pour installer VNC en mode “serveur” (où vous aurez même accès au choix utilisateur / écran GDM), suivez les instructions ici :
Here is a slight modification made to the original strap: how to use the quick release instead of the bolt+nut used with the head-strap.
This is the original head-strap:

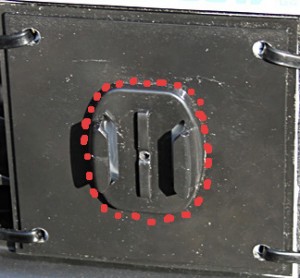
First, remove the protruding part from the head-mount to get a flat surface.

Then cut around the Quick Release from the black plastic plate. (you can also use the flat sticky mount too, but I prefered to save it).

Glue them altogether using preferably epoxy (two compound).
And voila:

Then, finally, you can remove the extra strap by pushing it through the chink.
Usable anywhere:

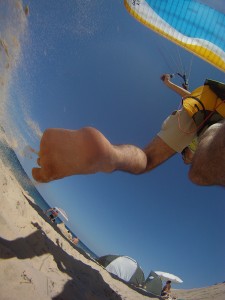
To get amazing shot like this, and be able to swap it from leg to helmet in mater of second instead of losing the nuts in the sand…. (dunno what mechanics engineers were thinking about when designing this part)

