Record desktop into Flash video

Video is better than words ? Let’s go for a screencast !

First, get this tar.gz program : http://www.unixuser.org/~euske/vnc2swf/pyvnc2swf-0.9.1.tar.gz and uncompress it into a directory of your choice.
Thus, you need to install python-tk with : sudo apt-get install python-tk and you also need to install python-pygame with : sudo apt-get install pyton-pygame.

Then, you can launch the GUI with vnc2swf.py

This tool is simple, it is based onto VNC server (you can of course use VNC Server provided with Gnome). So, you have to launch your VNC server (or configure remote desktop access into Gnome) before start recording your desktop and you have to disable Beryl (if used) and return under Metacity.
Another great tool included is edit.py which one you can resize (for example) your flash video : edit.py -o final.swf -s 0.5 original.swf (50% factor size)

Main page of this tool

Great tutorial about this tool

Tunnel console SSH

Il est bon de savoir qu’on peut cascader des connexions SSH, pour se connecter à une machine D depuis une machine A en passant par les machines B et C.

schéma : poste utilisateur A —> machine B —> machine C —> serveur à joindre D

La commande est toute simple :

ssh -t userB@machineB ssh -t userC@machineC ssh userD@machineD

Vous avez bien évidemment la possibilité de passer toutes les options SSH habituelles pour chaque machine intermédiaire ou finale.

Display current MP3 title in GAIM played with AMAROK

Useless feature but…..

+ +
So you have Ubuntu, Amarok and of course Gaim.

So download Slashexec source for Gaim from here.

cd ~/Desktop

tar -zxvf gaim-slashexec*.tar.gz

cd gaim-slashexec*

sudo apt-get install gaim-dev

./configure

make

sudo make install

Restart Gaim and in Tools>Plugins>/exec (activate)

Activate also “Text remplacement” and add a rule with:

mymp3

/exec -o echo `dcop amarok player artist` – `dcop amarok player title`

I think you can find the good command for any other player.

In the help file you can see a function, to display to the buddy “-o”.

Adding the -o flag to /exec causes SlashExec to send the output to the conversation (i.e. the buddy or chat receives the output). For example, /exec -o ls -1R | sed 's/ /\\ /' will cause the output to be sent.

Enjöy

Accéder à un serveur ssh dans un lan privé

Edit : commande pour du remote tunnel : ssh userName@ssh-server.example.com -N -f -L 3689:remote-server.example.com:3689
Superbe article sur comment tunneler en ssh :

Depuis un bout de temps je cherchais un moyen d’accéder au serveur ssh d’une machine se trouvant dans un réseau local et n’ayant pas forcément la possibilité de rediriger un de ces ports vers la machine. Et j’ai trouvé ! Miracle ! Encore une fois, la puissance de SSH va nous être d’une grande utilité! Puisque nous allons travailler sans autres programmes que ssh client et serveur.

Soit MaLocale, la machine à l’intérieure de mon réseau local et MaDistante, le serveur ssh accessibles depuis l’internet.

De votre coté (sur MaDistante) n’oubliez pas de rendre disponible le port 2345 sur votre machine (Nat, Firewall, …)

Pour établire le premier tunnel (1), entrez sur “MaLocale” la commande :

ssh -R 2345:localhost:22 utilisateur@MaDistante

Ici, la commande indique qu’il faut rediriger le port 2345 de MaDistante vers le port 22 de MaLocale.

Ensuite, nous allons établir le chemin (2) qui va nous permettre d’exécuter des commandes depuis MaDistante sur MaLocale. Tapez alors sur votre machine MaDistante :

ssh -p 2345 utilisateur@locahost

Ici, on indique qu’il faut se connecter sur la machine locale sur le port 2345. Et là, miracle, nous voyons apparaître un prompt de la machine MaLocale :

utilisateur@MaLocale:~$

Nous avons donc maintenant la possibilité de faire la maintenance ou de régler le petit problème de votre ami ou de votre grand-mère sans avoir ouvert de port sur le firewall ou le routeur 🙂

source

Connecting Bluetooth device: Ubuntu

I own a “cheap-o-dongle-microtune” usb of course who look like that: (but with rubber tape around)

And a Nokia with the bluetooth feature.

First, plug the dongle…. easy and os-independant.

Add/remove > Bluetooth File Sharing or sudo apt-get install gnome-bluetooth obexserver bluez-utils bluez-passkey-gnome

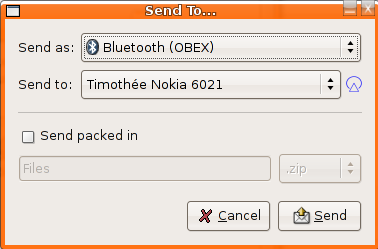
And, OOOoooo, left clic to any file, send:

bluetooth1.png

It’s working, with a nice GUI.

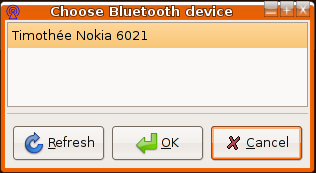
I’ve some troubles to send multiples files, so, I made this send-bluetooth.gz, extract to the ~/.gnome2/nautilus-script/ folder (left-click menu).
bluetooth3.png

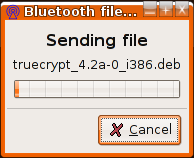
Now you can use your cellphone as a storage device.

bluetooth2.png

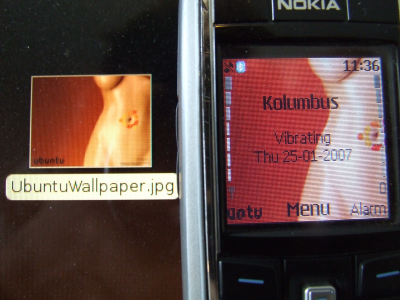
And even download new wallpapers.

bluetooth4.png

If you encounter strange problems, here is a complete How-to.

Once again, Ubuntu / Linu Rocks, since for the same dongle, used with Windows Xp, need some illegal/cracked Widecom/Microtune drivers.

(you can check once plugged, that it is detected with $ lsusb and you should have a line like:

Bus 001 Device 006: ID 0f4d:1000 Microtune, Inc. Bluetooth Dongle

I already imagine yours complains:”Yea but it’s only a one-way connectivity”

Actualy, no:

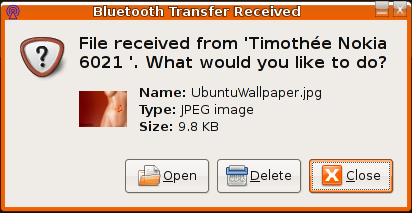
Send via bluetooth any file from your phone to your pc, and, a nice screen appear:

bluetooth5.png

Here we go, enjoy.

Use Stadia’s SSH/Proxy Tunnel: Ubuntu

Use Stadia’s SSH Tunnel: Ubuntu
This tuto is also suitable for any SSH Proxy in any School. I’m a student of Helsinki Stadia Polytechnic (Finland).
(HOW to for Windows (stadian-tunnel.pdf) (in Finnish but pictured))

Gnome SSH Tunnel Manager
A graphical front-end for managing ssh tunneled portredirects, dockable in systray

gstm
http://gstm.sourceforge.net/
Debian pakage for Ubuntu
Download and install it
the in Ubuntu>Application>Internet>gSTM
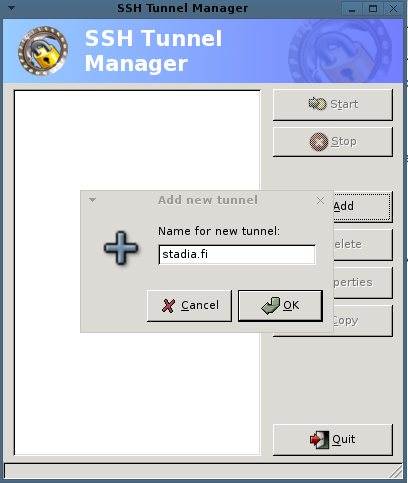
Add new Tunnel > stadia.fi

adddirect
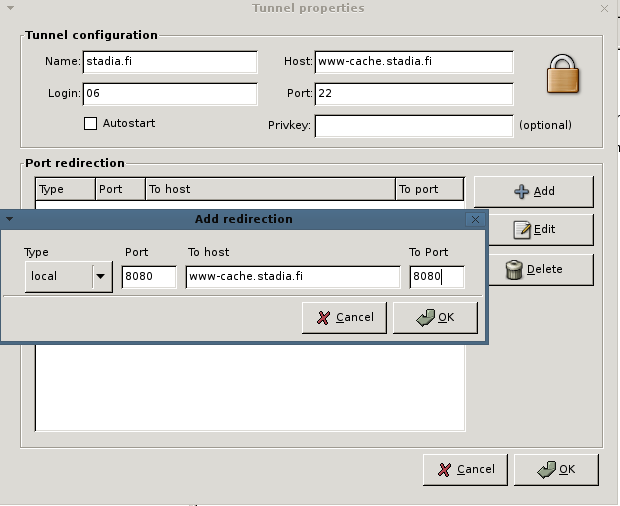
Host: cs.stadia.fi
Login: student number (0******)
Autostart if you want it.
Add port redirection
local|8080|www-cache.stadia.fi|8080
Then Start, enter your stadia’s password

SwitchProxy Tool
Install this Add-on for a more convenient proxy switching in FireFox
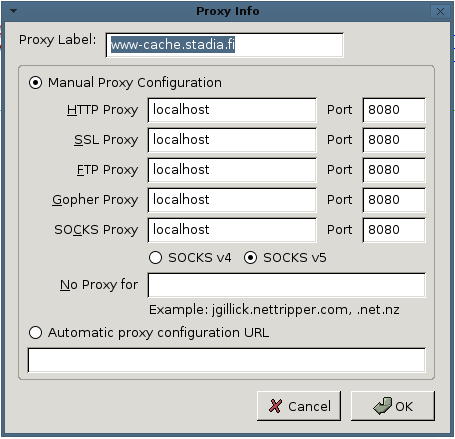
And Add a new Proxy with localhost and 8080 in every protocols
proxyff
Then Apply in the FF’s Proxy Bar

Here we go, we are connected trought the school’s network

google.png

IEEE’s Website is reachable now:

ieee1.png
“Welcome Helsingin Ammattikorkeakoulu Stadia”

Is writtend in the banner, dunno what it means, but now you can also use the MOT-Dictionary and translate it.